缘由
大部分 Linux 发行版可能都不提供更改音频采样率的设置界面,且默认采样率可能为 48Khz (PCM 模式)。如果你是 HIFI 玩家,拥有外置声卡,默认采样率将无法满足需要。
解决
注意,这里以 Archlinux 系统并使用 pipewire 作为演示,版本差异或错误的更改将导致你无法播放音频。
依赖
- pipewire
- wireplumer
wireplumer 是 pipewire 的会话及策略管理器,使用以下命令安装。
sudo pacman -S pipewire pipewire-alsa pipewire-pulse wireplumber安装后,尝试使用以下命令停止并启动服务。
sudo systemctl stop pulseaudio.service
sudo systemctl start pipewire-pulse.serviceCode language: CSS (css)
若无法找到该服务,请重启以完成初始化过程。
关于使用 pipewire 以替代 pulseaudio 的理由,请参阅这里。
验证
使用以下命令以进行 pipewire 的安装验证。
pactl info若安装正常,应获得下列输出。
...
Server Name: PulseAudio (on PipeWire x.y.z)
...Code language: CSS (css)
找到你的音频设备
使用以下命令列出当前的声卡。
➜  ~ wpctl status
...
Audio
 ├─ Devices:
 │      ...
 │
 ├─ Sinks:
 │  *   47. Type-C HiFi Audio Adapter Analog Stereo [vol: 0.20]
 │      48. Family 17h/19h HD Audio Controller Speaker + Headphones [vol: 0.64]
 │
...
根据输出结果,我们确认当前序号为 47 的声卡为目标外置声卡。
使用以下命令获取该声卡的详情信息。
➜  ~ wpctl inspect 47
id 47, type PipeWire:Interface:Node
...
  * node.name = "alsa_output.usb-TTGK_Company_Type-C_HiFi_Audio_Adapter_5000000001-01.analog-stereo"
  * node.nick = "Type-C HiFi Audio Adapter"
...Code language: JavaScript (javascript)
我们需要使用该声卡的特定标识以自动识别并指定位深及采样率,以上输出仅保留了可作为唯一识别的键值对。
获取该声卡支持的输出模式
使用以下命令找到你的声卡标识。
➜  ~ aplay -l
**** List of PLAYBACK Hardware Devices ****
...
card 2: Adapter [Type-C HiFi Audio Adapter], device 0: USB Audio [USB Audio]
  Subdevices: 0/1
  Subdevice #0: subdevice #0Code language: PHP (php)
若 aplay 命令未找到,请安装 alsa-utils。
使用以下命令查看该声卡支持的模式。
➜  ~ cat /proc/asound/card2/stream0
TTGK Company Type-C HiFi Audio Adapter at usb-0000:03:00.3-2.4, high speed : USB Audio

Playback:
  Status: Running
    Interface = 2
    Altset = 3
    Packet Size = 400
    Momentary freq = 351036 Hz (0x2b.e126)
    Feedback Format = 16.16
  Interface 2
    Altset 1
    Format: S16_LE
    Channels: 2
    Endpoint: 0x03 (3 OUT) (ASYNC)
    Rates: 44100, 48000, 88200, 96000, 176400, 192000, 352800, 384000
    Data packet interval: 125 us
    Bits: 16
    Channel map: FL FR
    Sync Endpoint: 0x84 (4 IN)
    Sync EP Interface: 2
    Sync EP Altset: 1
    Implicit Feedback Mode: No
  Interface 2
    Altset 2
    Format: S24_3LE
    Channels: 2
    Endpoint: 0x03 (3 OUT) (ASYNC)
    Rates: 44100, 48000, 88200, 96000, 176400, 192000, 352800, 384000
    Data packet interval: 125 us
    Bits: 24
    Channel map: FL FR
    Sync Endpoint: 0x84 (4 IN)
    Sync EP Interface: 2
    Sync EP Altset: 2
    Implicit Feedback Mode: No
  Interface 2
    Altset 3
    Format: S32_LE
    Channels: 2
    Endpoint: 0x03 (3 OUT) (ASYNC)
    Rates: 44100, 48000, 88200, 96000, 176400, 192000, 352800, 384000
    Data packet interval: 125 us
    Bits: 32
    Channel map: FL FR
    Sync Endpoint: 0x84 (4 IN)
    Sync EP Interface: 2
    Sync EP Altset: 3
    Implicit Feedback Mode: No
  Interface 2
    Altset 4
    Format: SPECIAL
    Channels: 2
    Endpoint: 0x03 (3 OUT) (ASYNC)
    Rates: 44100, 48000, 88200, 96000, 176400, 192000, 352800, 384000
    Data packet interval: 125 us
    Bits: 32
    DSD raw: DOP=0, bitrev=0
    Channel map: FL FR
    Sync Endpoint: 0x84 (4 IN)
    Sync EP Interface: 2
    Sync EP Altset: 4
    Implicit Feedback Mode: No
在这些输出模式中选择出你需要的格式及采样率,下列是我偏好的选择。
- Format -> S32LE
- Rate -> 352800
关于不同格式的具体含义,请参阅下表。
| alaw | A-law |
| mulaw | mu-law |
| fxxxx | floating-point |
| sxxxx | signed |
| uxxxx | unsigned |
| xxxbe | big-endian |
| xxxle | little-endian |
S32LE 为 PCM signed 32bit little-endian。
创建 wireplumber 自动输出模式更改脚本
脚本存于 /etc/wireplumber/main.lua.d/ ,若不存在,请使用以下命令创建。
mkdir -p /etc/wireplumber/main.lua.d/在该目录内新建脚本文件
#/etc/wireplumber/main.lua.d/51-dac-rate.lua
rule = {
  matches = {
    {
      { "node.nick", "equals", "Type-C HiFi Audio Adapter" },
    },
  },
  apply_properties = {
    ["audio.format"] = "s32le",
    ["audio.rate"] = 352800,
  },
}

table.insert(alsa_monitor.rules, rule)Code language: PHP (php)
注意,请自行替换相关参数。
重启 pipewire 服务
systemctl --user restart pipewire.serviceCode language: CSS (css)更改验证
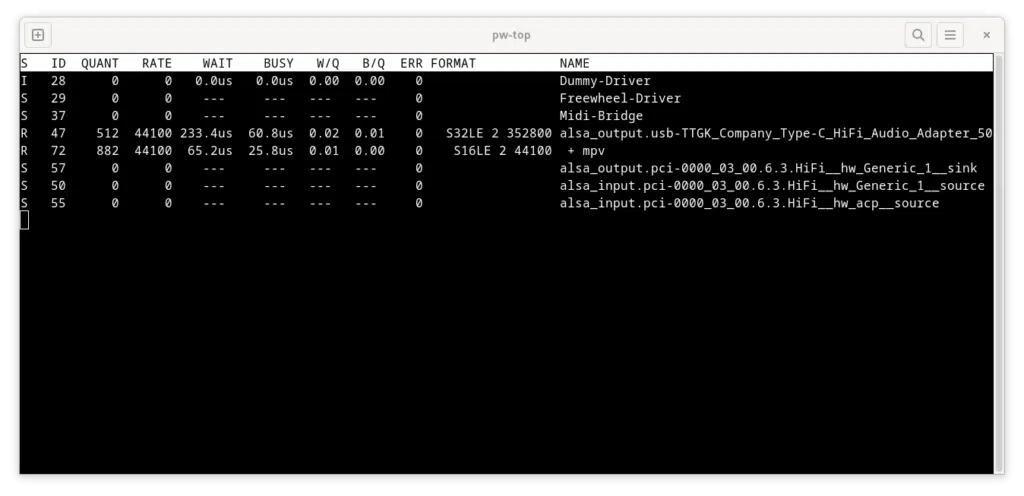
执行以下命令获取当前使用的 session
pw-top
图中可见 alsa_output* 已正确设置输出格式为 S32LE 2 352800。
关于第三方程序,输出格式请结合实际,更改输出设置。
完成
现在可以充分发挥外置声卡的功能啦~
0 条评论